Pre-Course Setup & Quarto Guide

ECON206 & ECON10

Professor Ken Suzuki

2026-04-06

Welcome!

Course Information

  • Courses: ECON206 & ECON10
  • Goal: Set up your development environment before class
  • Focus: Minimize setup issues during class so we can focus on coding

What We’ll Cover Today

Part 1: Pre-Course Setup

  • GitHub & Copilot
  • VS Code
  • Python
  • Quarto
  • Extensions

Part 2: Quarto Basics

  • Document structure
  • Adding figures
  • Creating tables
  • Writing equations
  • Rendering documents

Part 1: Pre-Course Setup

Step 1: GitHub Account & Copilot

Do this first — verification can take a few days.

Full step-by-step guide: GitHub Student Perk Guide

  1. Create a GitHub account
  2. Set up Two-Factor Authentication (2FA)
  3. Fill in Billing Information (no payment required)
  4. Upload your Enrollment Verification certificate as proof of enrollment

Tip: Apply on campus (or close to campus) — GitHub uses your location for verification and approvals are faster from the Clark network.

Step 1a: Create a GitHub Account

Go to https://github.com and click Sign up (top-right corner).

GitHub homepage — click “Sign up” in the top-right corner

Step 1b: Set Up Two-Factor Authentication

From your GitHub Dashboard, click your profile icon → Settings.

GitHub Dashboard — click profile icon, then Settings

Step 1b: Two-Factor Authentication (cont.)

In Settings, click Password and authentication in the left sidebar.

GitHub Settings — click “Password and authentication”

Step 1b: Two-Factor Authentication (cont.)

Enable Two-factor authentication. You can use the same authenticator app you use for Clark University.

Enable 2FA — use the same app as Clarku

Step 1c: Set Up Billing Information

Go to Settings → Billing and licensing → Payment information and click Edit next to Billing information.

No payment required — just fill in the address fields.

GitHub Billing — click Edit on Billing information (no payment needed)

Apply for the GitHub Student Developer Pack

Go to https://education.github.com/pack and apply.

What you get (free for students):

  • GitHub Copilot Pro — AI coding assistant inside VS Code
  • Access to other developer tools and credits

What GitHub needs from you:

  • A verified student email or proof of enrollment
  • Your location (apply on campus for fastest approval)

Tip: Apply while connected to the Clark University network — approvals are much faster.

Step 1d: Get Enrollment Verification

Log in to https://cuweb.clarku.edu. Under Student Records and Registration, click Enrollment Verification.

CUWeb — click Enrollment Verification under Student Records and Registration

Step 1d: Take a Screenshot

CUWeb displays your Current Enrollment Verification Certificate. Take a screenshot and upload it when GitHub asks for proof of enrollment.

Current Enrollment Verification Certificate — take a screenshot to upload

Students who used Enrollment Verification reported immediate approval!

Software Installation

Always Start with “Open Folder” in VS Code

Before creating or saving any file, every single time:

  1. Go to File → Open Folder
  2. Select your course folder (e.g., Economics/setup_test/)
  3. Create and save all files inside that folder

⚠️ Common mistake: Some students saved files outside the working directory — on the Desktop, in Downloads, or in a random location. When this happens, VS Code cannot find your other files and code will not run correctly.

❌ Don’t do this ✓ Do this
Open a .py file directly Open the folder first
Save to Desktop or Downloads Save inside your course folder
Drag a file into VS Code Use File → Open Folder

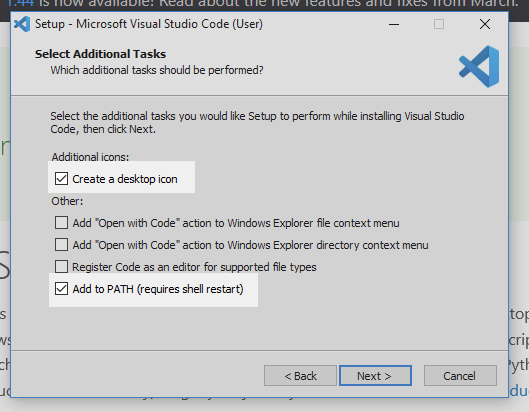
Step 2: Install Visual Studio Code

Download: https://code.visualstudio.com/download

Installation Tips (Windows):

  • Enable “Add to PATH”
  • Enable “Open with Code”
  • Register Code as an editor for supported file types

“Select Additional Tasks” — make sure “Add to PATH” is checked

Step 2: Test VS Code

  1. Open VS Code
  2. Go to File > Open Folder and select your setup_test folder
  3. Create a new file (e.g., hello.txt) and type something
  4. If VS Code opens and the file saves without errors, it’s working ✓

Step 2: Install VS Code Extensions

Click the Extensions icon on the left sidebar and install:

  1. Python by Microsoft
  2. Jupyter by Microsoft
  3. Quarto by Quarto
  4. GitHub Copilot by GitHub

Step 3: Install Python — Download

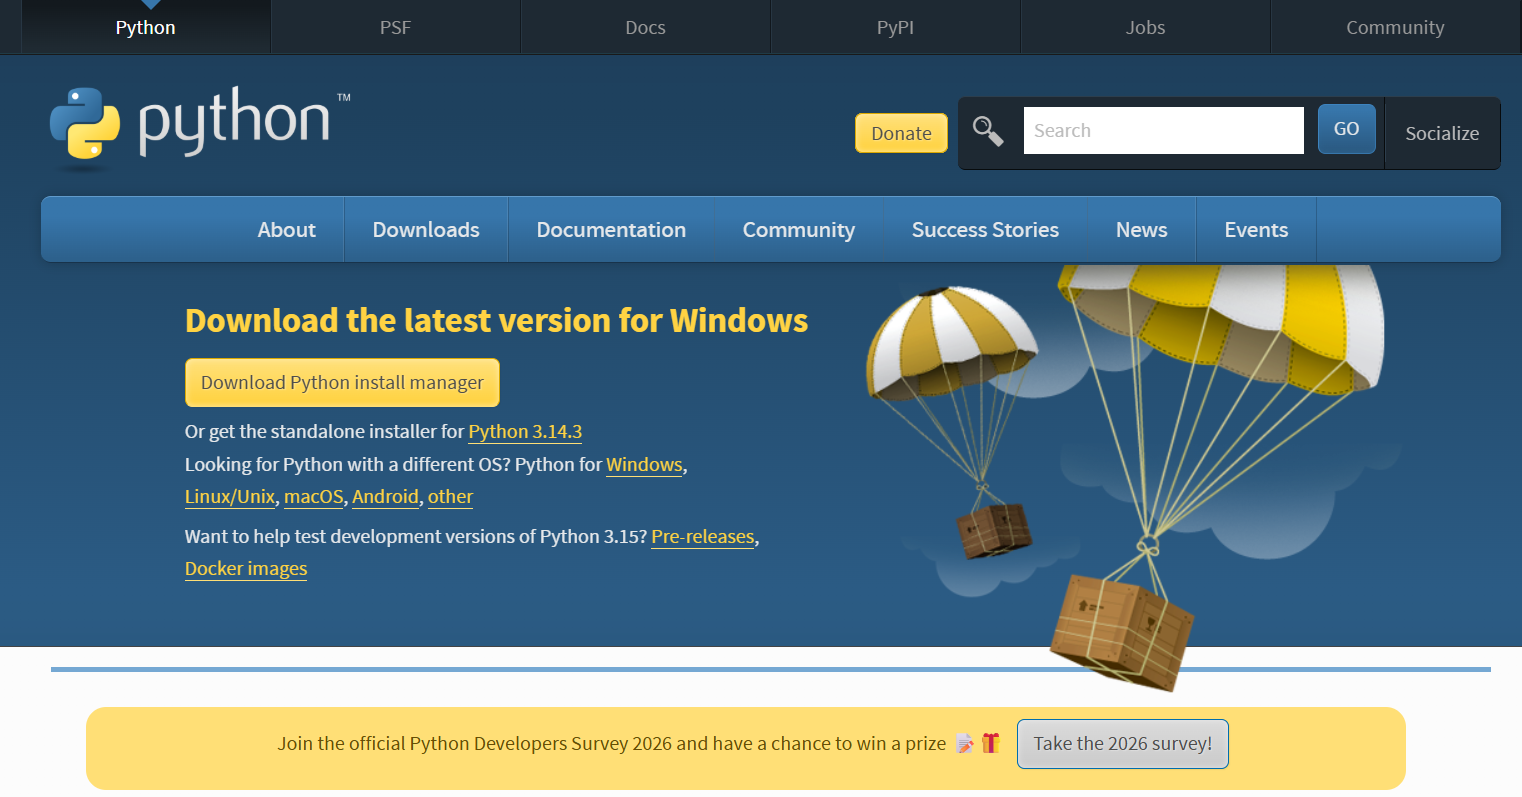
Go to https://www.python.org/downloads/

  • Windows: click “Or get the standalone installer for Python 3.14.3” to download a .exe file
  • Mac: click “Download Python 3.14.3” to download a .pkg file

Python download page — click the standalone installer link

Step 3: Install Python — PATH Checkbox (Windows)

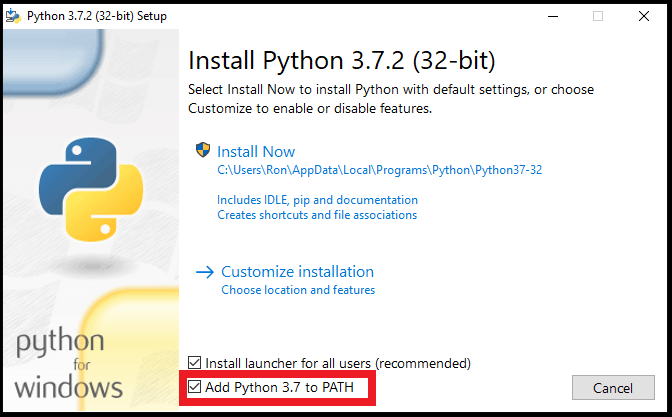
Key Step (Windows only):

✓ Check “Add Python to PATH” before clicking Install Now

On Mac, the installer sets PATH automatically — no checkbox needed.

Check “Add Python 3.14 to PATH” at the bottom before clicking Install Now

Opening the Terminal

Windows — Command Prompt:

  1. Click the Start menu
  2. Type cmd
  3. Open Command Prompt

Mac — Terminal:

  1. Press ⌘ Command + Space to open Spotlight
  2. Type Terminal
  3. Click Terminal in the results

Mac Spotlight — type “Terminal” and click the result

Step 3: Test Python

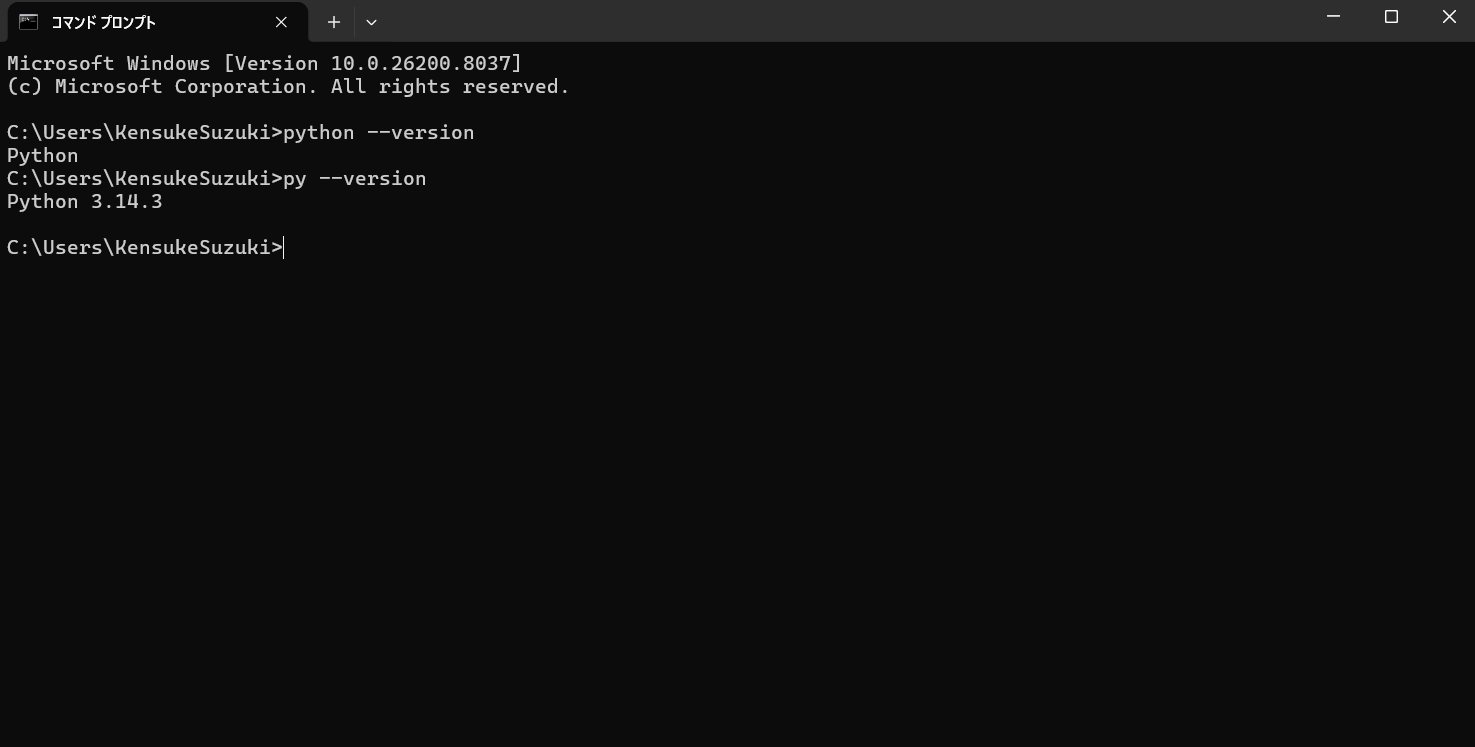
Windows — in Command Prompt or VS Code terminal:

python --version
# or
py --version

Mac — in Terminal or VS Code terminal:

python3 --version

Mac tip: Always use python3, not python — on Mac, python may not work or point to an old version.

Expected: Python 3.14.3

Command Prompt showing Python version after a successful install

Step 3b: Run Python in VS Code

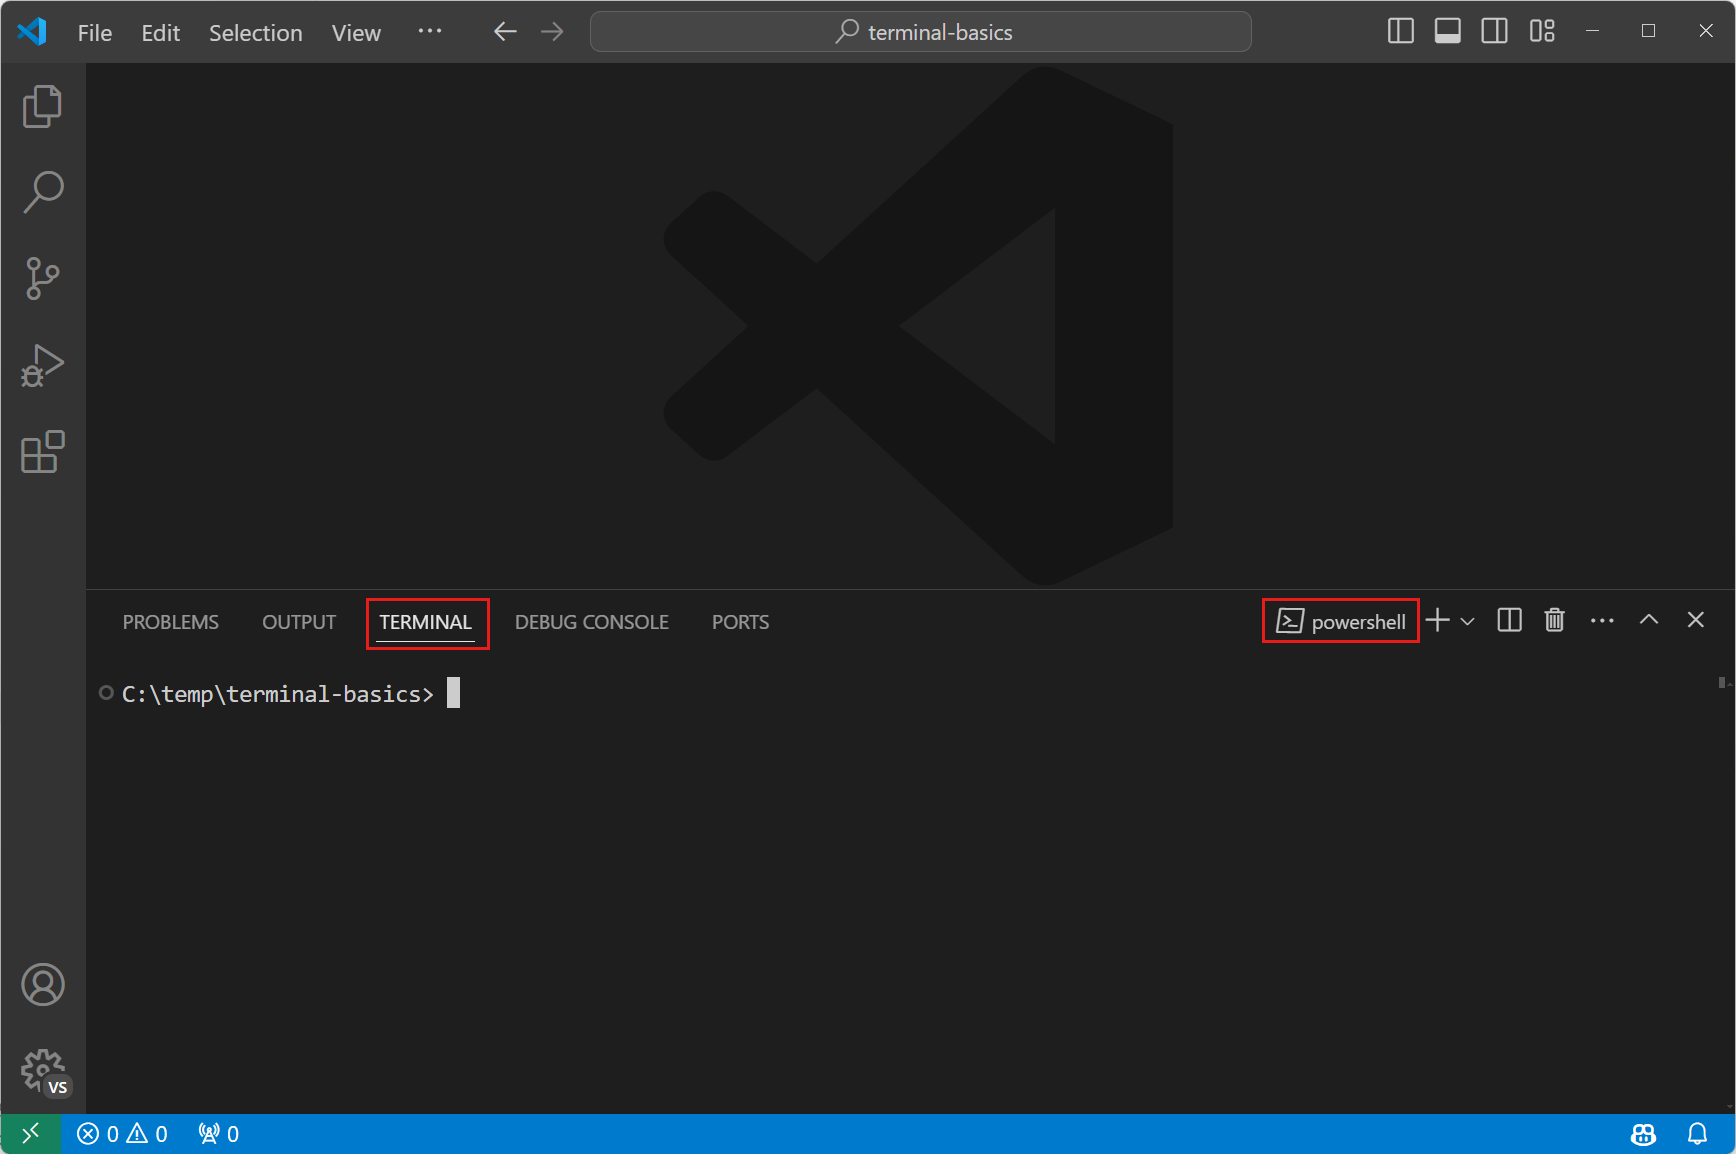
  1. In VS Code: Terminal > New Terminal
  2. Create test.py:
print("Python is working")
  1. Run:

    Windows: python test.py (or py test.py)

    Mac: python3 test.py

Expected: Python is working

VS Code terminal panel — opens at the bottom of the window

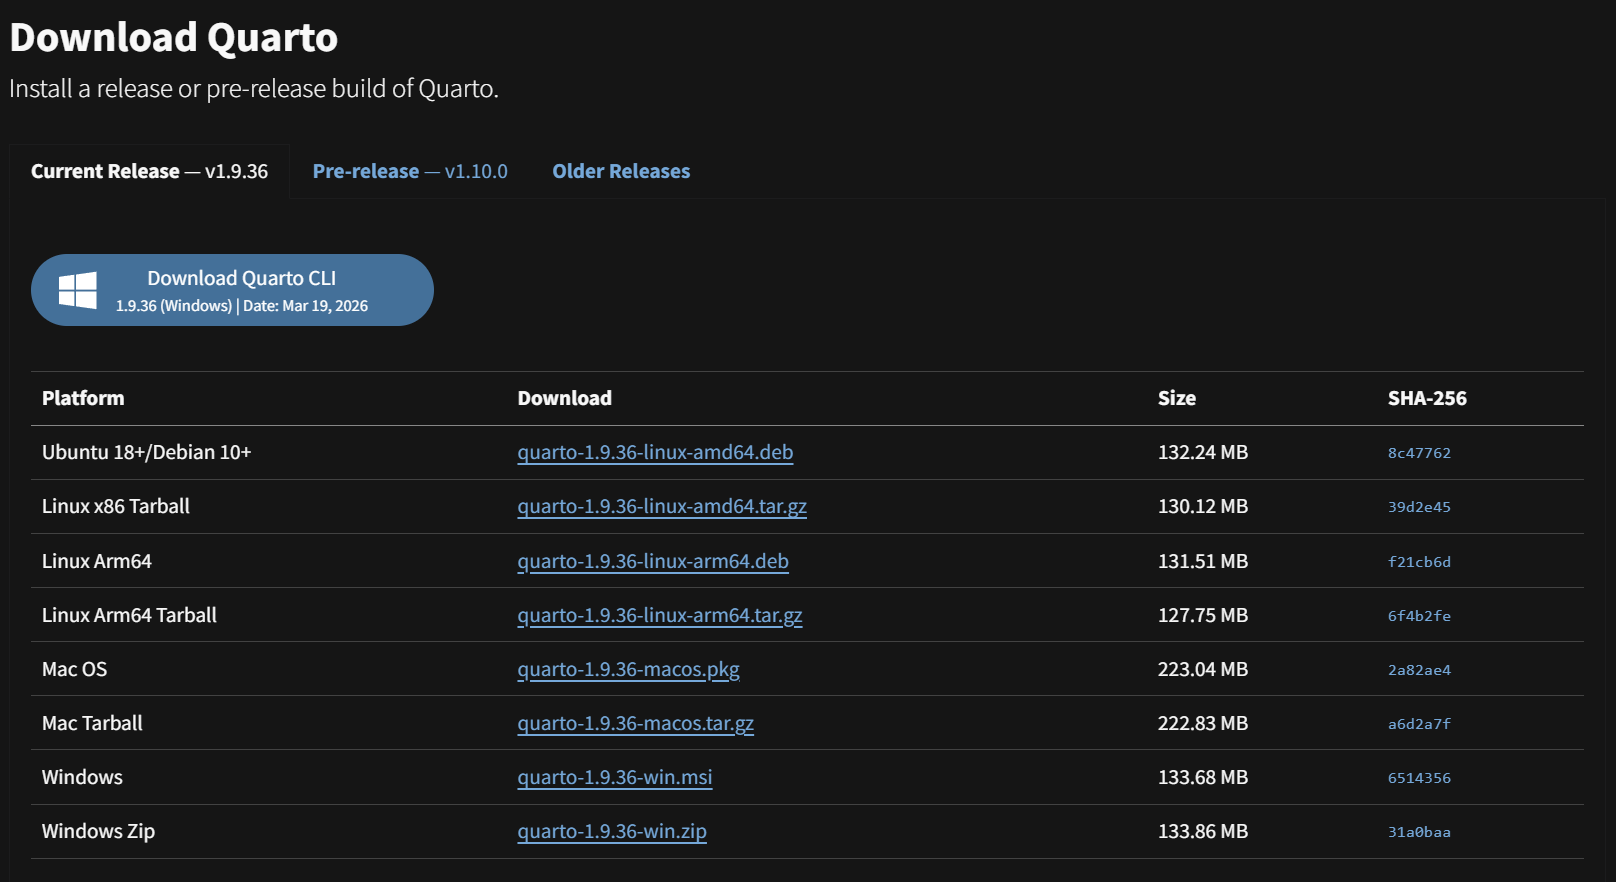
Step 4: Install Quarto — Download

Go to https://quarto.org/docs/get-started/

  • Use the current release v1.9.36 (not the pre-release)
  • Windows: download the .msi file
  • Mac: download the .pkg file

Run the installer and finish installation.

Quarto download page

Quarto download page — use the current release v1.9.36

Step 4: Test Quarto

Open the VS Code terminal (Terminal > New Terminal) and run:

quarto --version

Expected output: 1.9.36

If you see command not found, try restarting VS Code or your computer.

Step 5: Install PDF Engine for Quarto

Run this in your terminal:

quarto install tinytex

Quarto handles the download automatically. This may take a few minutes — that is normal.

Alternatives (if TinyTeX fails):

TeX Live · MiKTeX

Step 5: What Does That Command Mean?

Part What it does
quarto Calls the Quarto program you installed in Step 4
install Tells Quarto to download and install something
tinytex A lightweight LaTeX engine — needed to create PDF files

You do not need to visit any other website. Quarto installs TinyTeX for you automatically.

Step 5b: Test Quarto PDF Rendering

In your setup_test folder, create test.qmd:

---
title: "Quarto PDF Test"
format: pdf
---

# Test

If you can read this in a PDF file,
Quarto and the PDF engine are working.

Run:

quarto render test.qmd --to pdf

Expected: A new file test.pdf appears ✓

Verify & Finalize

Step 6: Confirm Everything Works

Installation

  • ✓ VS Code opens normally
  • ✓ Python runs in terminal (python --version)
  • ✓ Quarto runs in terminal (quarto --version)
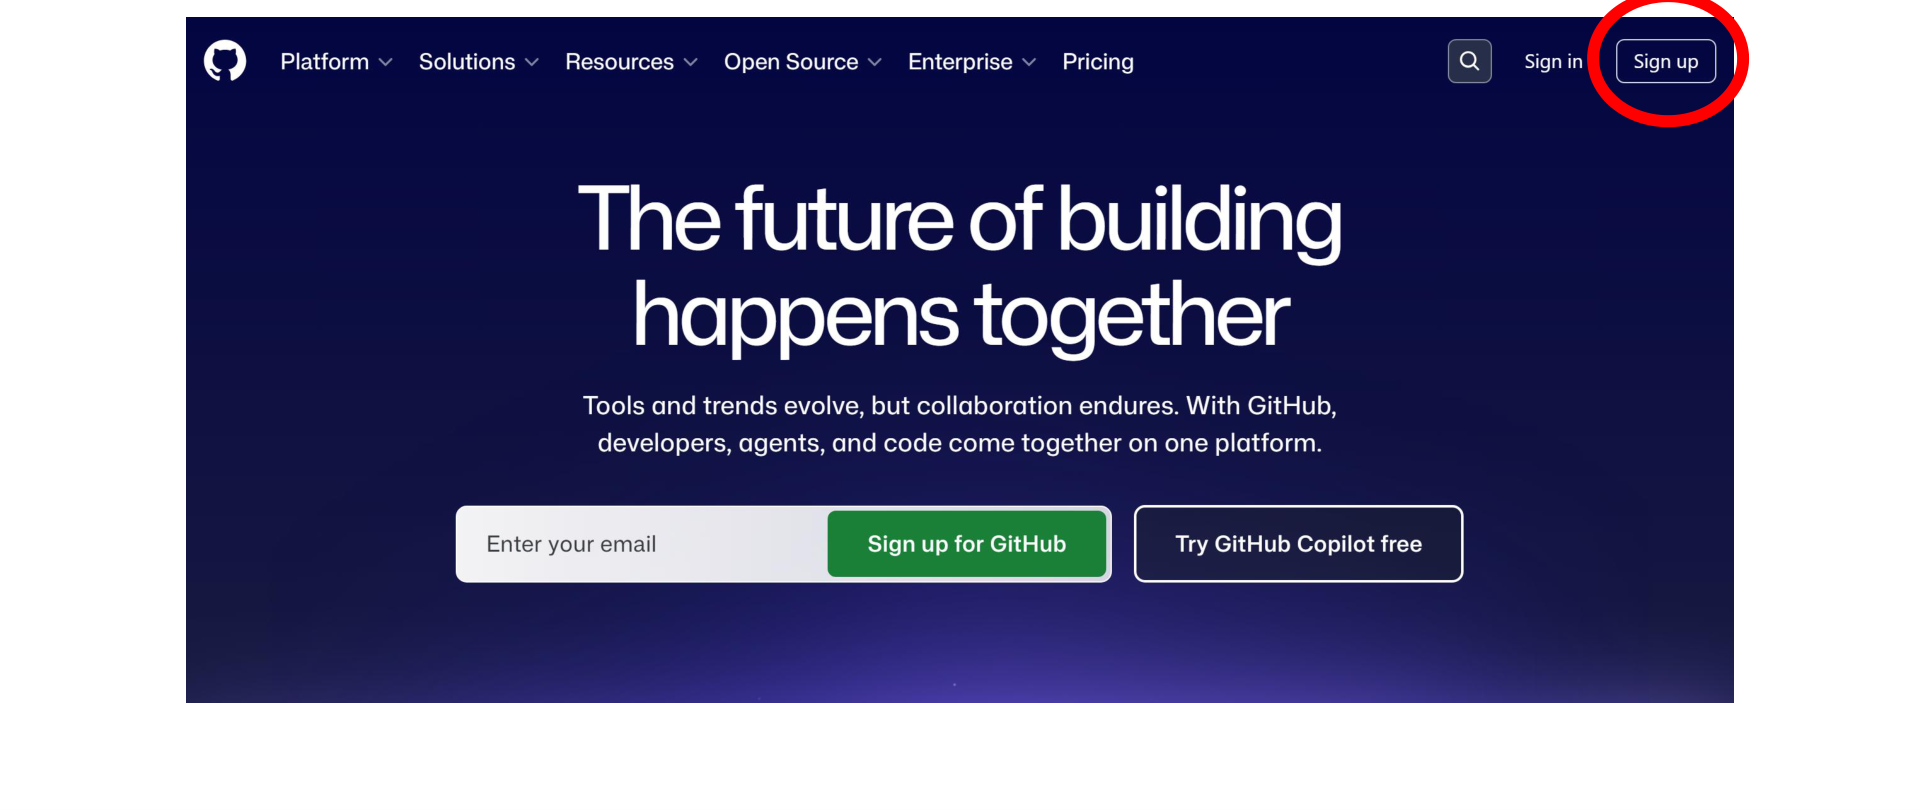
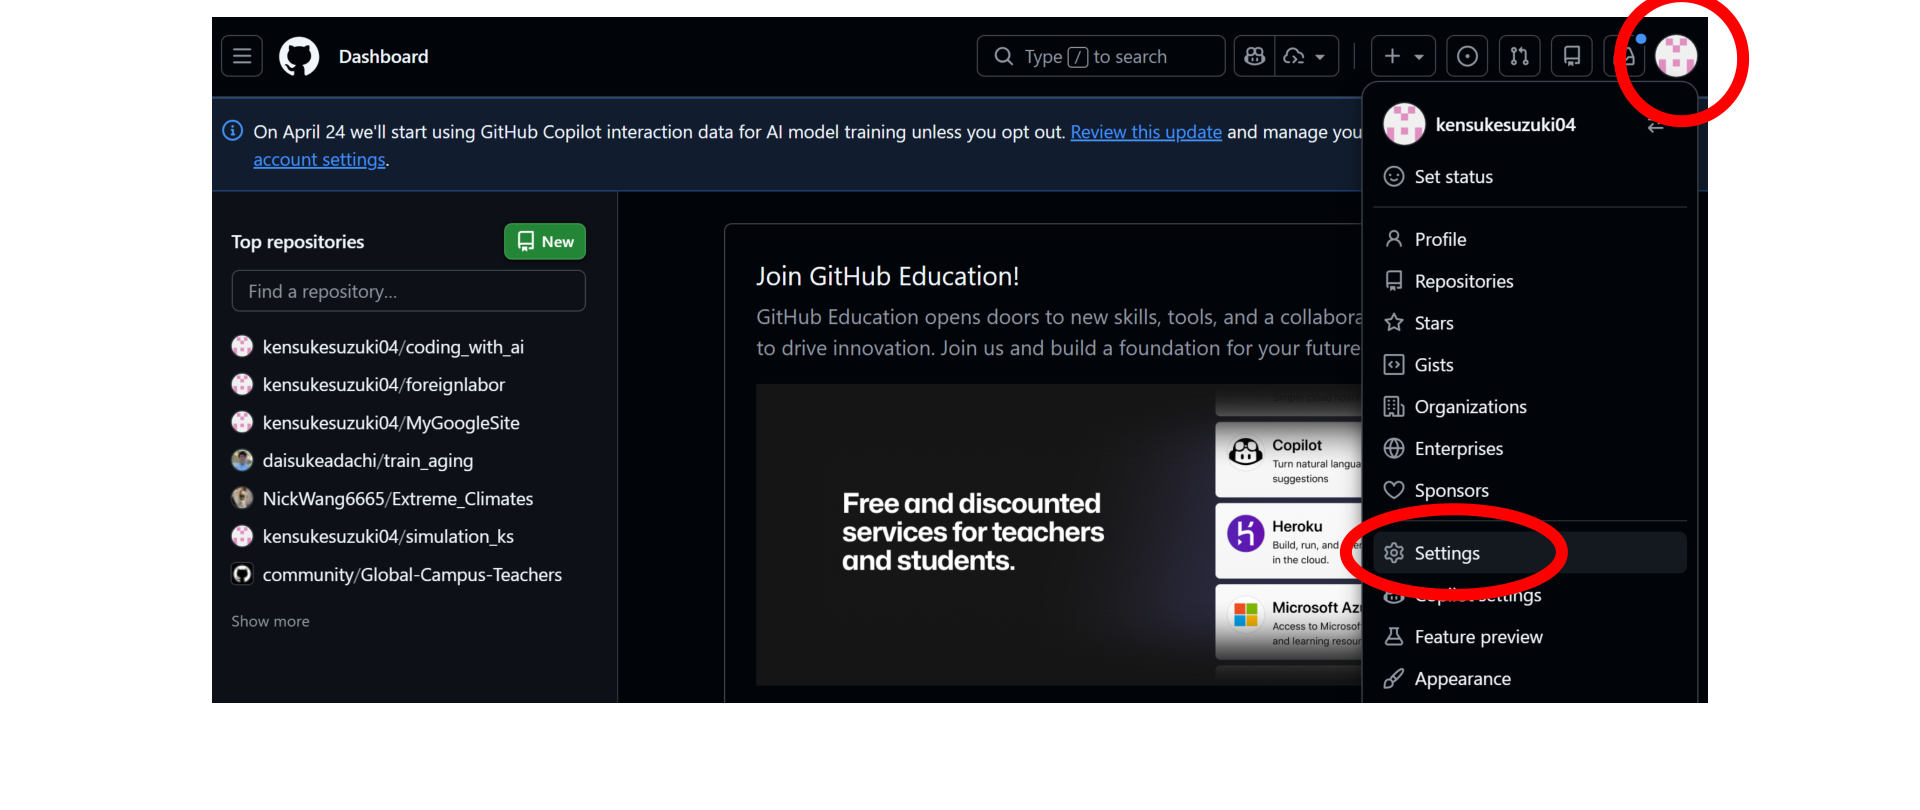
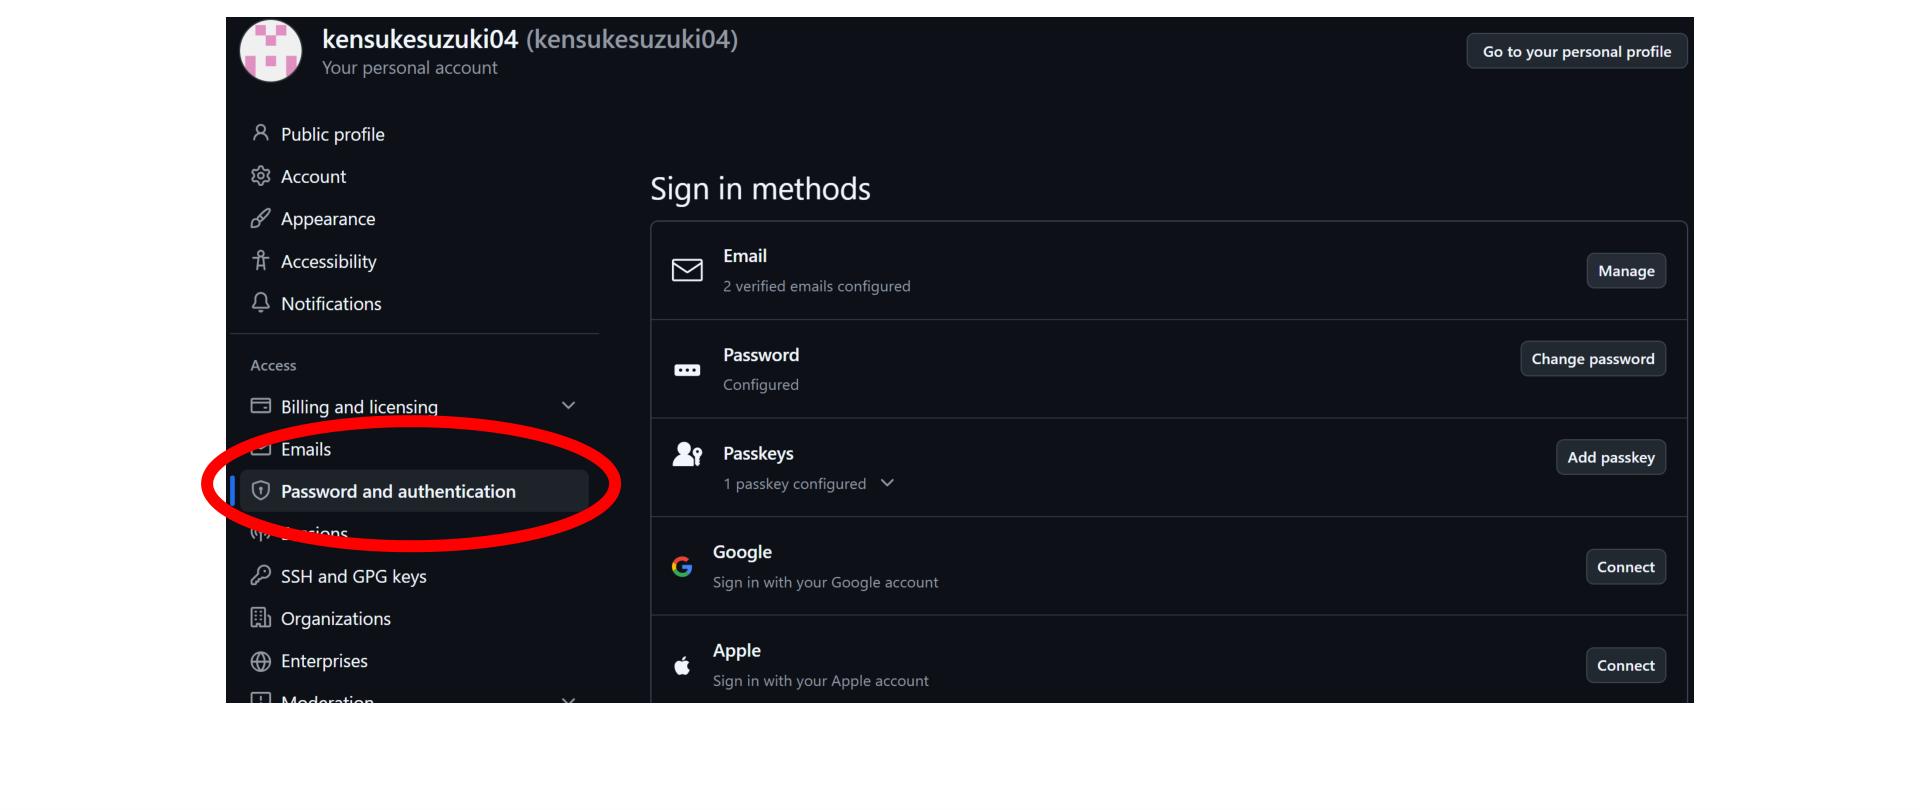
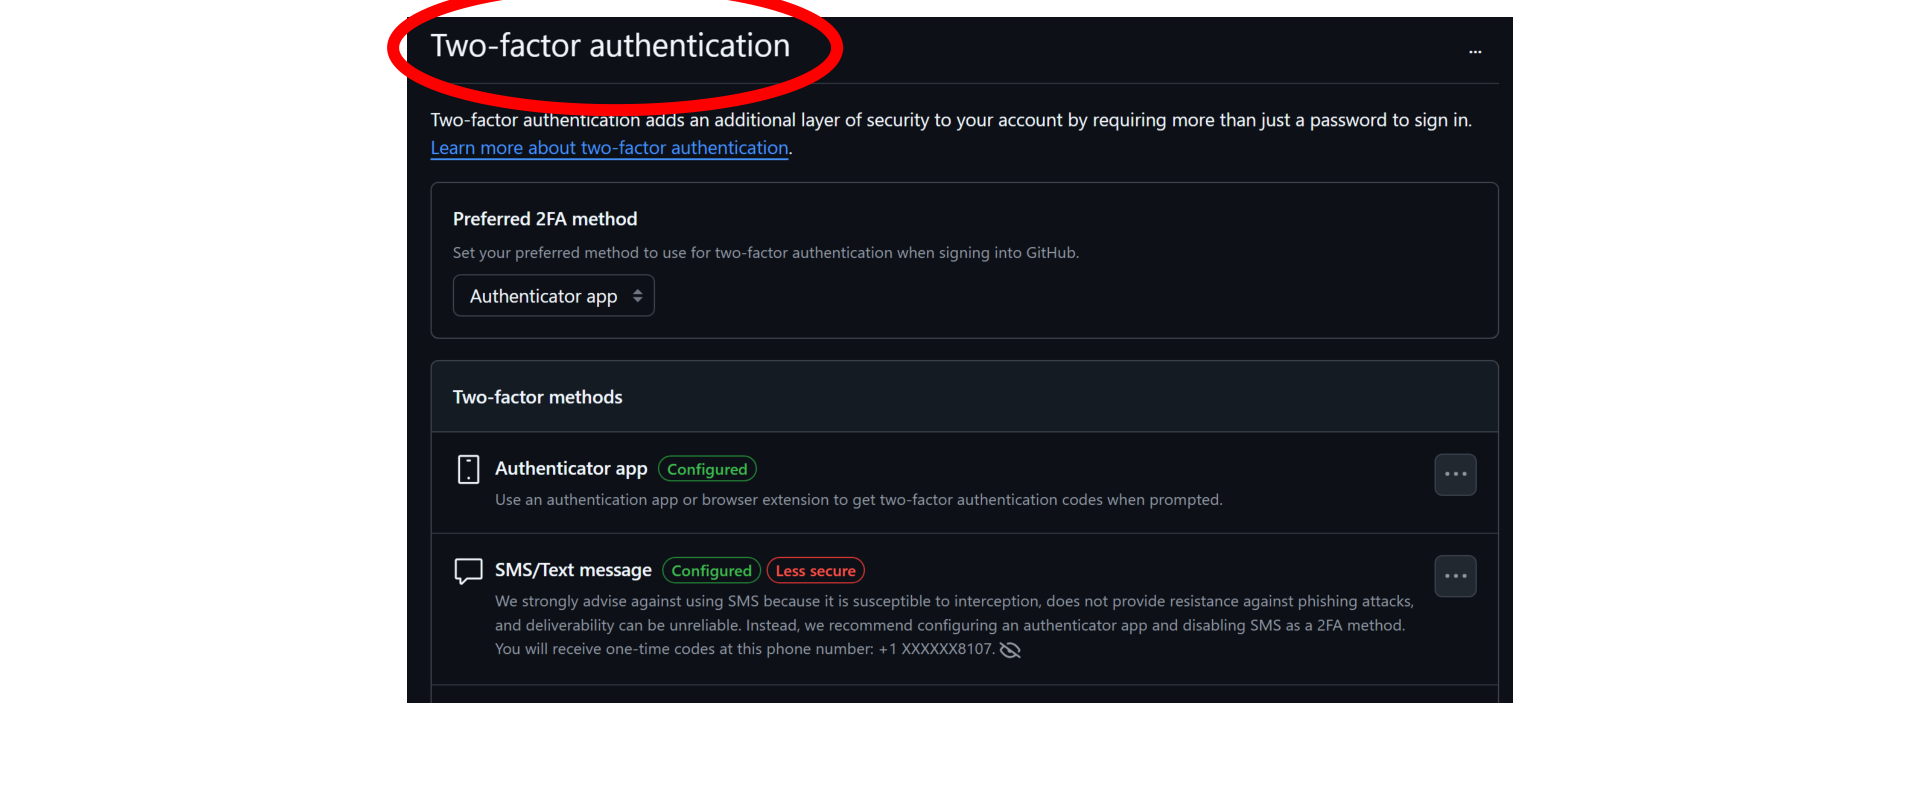
  • ✓ GitHub account ready for VS Code sign-in

Extensions & Tests

  • ✓ Python extension installed
  • ✓ Jupyter extension installed
  • ✓ Quarto extension installed
  • test.py runs successfully
  • test.qmd renders to PDF

What NOT to Install

  • ❌ Project-specific Python packages yet
  • ❌ Virtual environments yet
  • ❌ Additional data science tools yet

We’ll do all of this in class!

Part 2: Quarto Basics

What is Quarto?

Quarto is a document publishing system that lets you:

  • Write in Markdown
  • Include code and equations
  • Generate HTML, PDF, Word, slides, websites
  • Mix text, figures, tables, and code output

Key Concept: Working Directory

Simple Rule:

Keep your files organized in one folder:

my_project/
  ├── draft.qmd
  ├── figure1.png
  ├── table1.csv
  └── data/
      └── sample.xlsx

When you run quarto render draft.qmd, Quarto looks for files relative to this folder

General Template

---
title: "Draft Title"
author: "Your Name"
date: today
format:
  html: default
  pdf: default
---

# Introduction

Write 2-3 sentences about the purpose.

# Content Section

Your content goes here.

How to Add Figures

Same folder as your .qmd file:

![My figure caption](my_plot.png)

In a subfolder:

![My figure caption](figures/my_plot.png)

⚠️ Common error: Wrong file path or typo in filename

How to Make Tables: Option A

Simple Markdown table

| Item | Amount |
|---|---:|
| Apples | 12 |
| Oranges | 8 |

Renders as:

Item Amount
Apples 12
Oranges 8

How to Make Tables: Option B

Convert from Excel to CSV

  1. Save your Excel file as CSV
  2. Use an online converter to generate Markdown:
    • TableConvert: https://tableconvert.com/excel-to-markdown
    • TablesGenerator: https://www.tablesgenerator.com/markdown_tables
  3. Paste the output into your .qmd file

How to Write Equations

Inline equations (with $...$):

The demand function is $Q_d = a - bP$.

Renders as: The demand function is \(Q_d = a - bP\).

Display Equations

Block equations (with $$...$$):

$$
GDP = C + I + G + NX
$$

More examples:

$\frac{a}{b}$        # Fractions

$\sum_{i=1}^{n}$    # Summation

$\alpha, \beta, \gamma$  # Greek letters

LaTeX Math Resources

  • Overleaf: https://www.overleaf.com/learn/latex/Mathematical_expressions
  • Detexify: https://detexify.kirelabs.org/classify.html (draw a symbol to find its code)
  • Wikibook: https://en.wikibooks.org/wiki/LaTeX/Mathematics

How to Render Your Document

Basic render (HTML):

quarto render draft.qmd

Render to PDF:

quarto render draft.qmd --to pdf

Render to Word:

quarto render draft.qmd --to docx

⚠️ PDF error? Check your PDF engine installation

You’re Ready! 🎉

Next Steps:

  1. Before Class: Complete all installation steps
  2. Verify: Run the test files to confirm everything works
  3. In Class: We’ll build on this foundation together

Questions?

Feel free to reach out if you encounter any issues during setup!

Additional Resources